Category Archives: DIY

Free Father’s Day Card

IMG_8295

I can’t believe it’s Father’s Day in just a few days! It’s been a whirlwind of activities around here with all of the end of the year hoopla, 40th birthday celebrations, friends moving away and then there is this darn cold I have…no fun! As usual, I am putting together a last minute card and then hopefully I can save someone else a last minute trip to the store by offering a free printable! Click here for the download 🙂 Or visit my Frella Etsy Shop for a few other instant downloads!

If your husband is anything like mine, he can fix anything. I mean anything!!! I kid you not, he will 3D print an obscure part if he can’t find it in the store, just so he can fix, retrofit, or improve something. Sometimes I wish we could just hire someone, but then it’s also what I admire most about him. He never throws his hands up and says he can’t do it. He gets in there and figures out a way. And even our two girls have long learned that Baba (greek for Dad) can and will fix everything. He has fixed many a faulty toy wiring, had just the right glue for a broken ear, tail or leg and 3D printed a lost doll pacifier. He truly is amazing, but the most admirable is the way he can wipe those little tears right off their faces when he tells them he can fix their favorite toy.

Here’s to the amazing dads out there who fix life’s little (and big) problems! We love appreciate all that you do!

DIY Haunted House

img_6637

I’ll be honest, I love me some halloween decorations, but I’m not a fan of the gore. And to find simple halloween decorations, that also don’t lean toward cutesie is hard. So sometimes one must come up with their own and DIY it. I made this haunted house last year and I think I must have spied something similar, but didn’t want to fork over the large sum of money it cost. I have my limits on how much I want to spend on seasonal decor.

While I was at the craft store, I spied some unfinished bird houses and the idea popped in my head to come up with my own low cost version and I quite love it. And it’s super simple…like I would do anything that wasn’t 😉 So without further ado, here is what you need:

Supplies:

  • Unfinished wood bird house from local craft store
  • Black acrylic paint
  • Black glitter
  • Paint brush
  • Sponge brush
  • Clear household glue (like this one)
  • Cookie tray with low sides to catch the glitter and lined with wax paper (or any kind of paper to protect your cookie sheet from paint)

How To:

  1. Place the bird house in the cookie sheet and paint it black with the paint brush.
  2. Once paint is dry, cover the house with clear glue all over with sponge brush.
  3. Before glue dries, add the black glitter. Voila! You have a sparkly haunted house!


Easy DIY Abstract Art Paintings: Initials

img_6399


So here’s the thing. I love art. I appreciate art and artists for their enormous talent and creativity. However, I have a hard time committing to purchasing “real” art! I admire art and am in constant awe of how artist’s minds can create paintings and sculptures and bring them to life. But for some reason I can never pull the trigger on actually buying art from artists. My husband has bought me several prints from Jenner Ament (she’s amazing!) and I love her work, but the key words here are, “my husband bought”. Truthfully (and somewhat embarrassing) most of my art around the house is from old calendars I have framed or something I have done myself. I have this mentality that I can recreate something myself. I’m a DIYer at heart and so if I see something I like, I usually find a way to create it myself.

fullsizerender-2


With this in mind, I have been loving all of the black and white abstract art I’ve been seeing lately. I figured with my modest art/painting background, I could come up with something myself (this may be a curse or a blessing. I’m not sure which!). I have wanted to switch out the floral prints in my bedroom (…another old calendar installation) and so I thought this would be a perfect opportunity to dust off my paint brushes and see what I could come up with. I’ve had the supplies all summer, but I’ve been hesitant to start because if I don’t have something intentional to paint, then I could see it becoming a big ol’ mess of paint on the paper and no message behind the reasoning of the strokes. After thinking about it off and on over the summer, I finally got my inspiration! Two of the most inspirational people in my life are my two girls. Why not take their initials and paint them in a abstract way to achieve that “look” I’ve been admiring without it being so literal with a big “V” and “E” on our walls. After a few attempts and versions, I like how they turned out. It didn’t take a ton of time, wasn’t super messy, and it makes me think of my two little angels when I look at my bedroom walls. Easy peasy and something anyone regardless of artist talent (I’m by no means a painter!!!) could tackle.

Free Printable Teacher Thank You Card – Phew!

IMG_4599Did teacher appreciation week sneak up on anyone else like it did me?! If it did, rest easy, I have a free printable teacher thank you card for you! Our teachers do a wonderful service in teaching and guiding our children to be prepared for adulthood. And nothing is more valuable then a teacher who cares about and works hard for our children. So regardless of our hectic lives and stuff we have going on, I at least want to give them a card – after all, our kiddos spend more time with their teachers than they do their parents during the school year (sniff, sniff). Just click here and print on white card stock and you are good-to-go to say “thank you” to that special teacher in your children’s lives.

Also, check out the free recipe cards I posted last week. I had my girls tell me their favorite recipe and then I typed them on the cards, printed them and am pairing them with these mini measuring spoons for a simple, yet sweet personalized gift for their teachers.

Mail Organizer Secret!

IMG_4494
For years I have had to stare at our pathetic mail organizer on the counter across the kitchen island where a spend a good portion of my day. I have never liked it no matter if it was clean and organized or messy…which was 99.9% usually the case. I’ve always wanted to get rid of the thing, but I have never been able to find suitable homes for those random bits of mail/coupons/business cards/Netflix mover to return or the odd leftover school picture. So after about nine years of internal mental deliberation, I finally came to peace with my nemesis. It won’t go away. Ever. Even if I put it all in the junk drawer below, those random bits of things will start creeping back on the corner in plane view and mock me in my defeat. Soooo, if you can’t get rid of it, why not make it prettier?

IMG_4489This is a picture of it cleaned up in the new organizer – still way better than it was, but I wasn’t happy.

Once I finally got around to finding a prettier version of what I had and one that contained the chaos better, I felt a lot better about my enemy. BUT, it still looked messy!! Aaagh! Then a light bulb went off in my head. If you can’t clean it, hide it. That’s what under the bed is for and those weirdly shaped under stair closets, right?! So out came my ruler to measure and I got to designing a typographic cheeky phrase that was both fun, clean and measured perfectly to hide my eternal chaos. I have to say, I am far more zen every time I look up from my kitchen sink and see my “neatly organized” mail  😉 It’s still all there, just hidden! What do you think?

Quick and Easy Hot Cross Buns

IMG_4357I was determined to make hot cross buns for Good Friday today and although they came out differently than I had anticipated, they came out delicious and far quicker than I had planned!! I thought I had yeast to make the traditional version, but because just assumed I had some, when it came to the yeast step and went to grab it…sigh…I was out. So with a little improv and internet checking, I came up with a baking powder version for what I had already started and they came out yummy and easy!!! A little different in texture of course, but the flavors are there 🙂 The recipe is below as well as some instagram easter basket and egg decorating idea pics I posted for Easter.

Ingredients:

  • 3 cups flour
  • 4.5 tsp baking posder
  • 1/2 tsp salt
  • 1/4 tsp cardamom
  • 1/4 tsp nutmeg
  • zest of one navel orange
  • 1/2 tsp ground cinnamon
  • 3 Tbsp butter room temp
  • 1/4 cup sugar sugar
  • 1/4 cup dried cranberries
  • 1/4 cup chopped dried apricots
  • 1/4 cup raisins
  • 1 egg
  • 1 cup buttermilk

Directions: Makes 12

Preheat oven to 350 F

  1. Whisk dry ingredients, sugar, orange zest and fruit into a large bowl.
  2. Rub in butter with fingers until mixture resembles fine breadcrumbs.
  3. Whisk buttermilk and egg together and add to dry ingredients. Mix just until a soft dough forms.
  4. Turn onto a floured board, knead lightly.
  5. Pat out to approximately 1 inch thickness and, using a 3-4″ round cutter, cut into buns.
  6. Place onto lightly greased oven tray.
  7. Bake at 350 for 12-15 minutes.
  8. Glaze: Mix 1/4 cup powdered sugar with buttermilk one tablespoon at a time until a paste is formed.
  9. Remove from oven and brush buns with glaze.  
  10. Cool buns on a wire rack. Cut slivers of dried apricots to make crosses and place on top of buns.


IMG_4326

Easter basket inspiration. Most of these items are from the Target Dollar Spot…ummm…super cute bunny tote, right?!

IMG_4345

I decorated some eggs and went the super simple, yet chic route: brown eggs and a white Sharpie – how easy can it get??!!


Natural Food Facials: Simple, Natural and Costs Pennies

IMG_4218Last Friday, I had a rare morning with just my oldest daughter while she was off school for the day and my youngest was at her school for a few hours. I wanted to do something special with her and since she’s seven now, I thought trying facials together would be a fun way to spend it. And it was!!

I was about to go buy a facial mask from the store, but then remembered that I have always wanted to try using ingredients we have in the kitchen for an all natural approach. After we dropped little sis’ off, we looked online for some inspiration and then we proceeded to rummaged through the kitchen. Low and behold, I had everything we needed and didn’t need to make a trip to the store…another rare moment 😉 Amen to that!!

You don’t really need to follow any hard and fast recipe for the amounts, but we used 1/3 cup oatmeal soaked in hot water for a few minutes, two tablespoons greek yogurt, a mashed banana, a few tablespoons of honey, an egg white and of course some cucumbers for our eyes. My daughter thought this part was a crack-up!! After a little bit of mixing and then putting it on our faces, we were good-to-go and relaxed by the fireplace for 15 minutes while our faces soaked up all the goodness we put on our faces.

IMG_4221

I feel like our lives are so rushed and going here and there, that there are so few moments for us to relax and enjoy each other’s company. I’m so happy she chose to do at home facials instead of a bike ride (would have meant me chasing after her!). My younger one is far more needy of my time, so to have the chance to try something new with my oldest, uninterrupted, low-key, fun and silly, was a joy.

Valentine Class Bookmark Cards – Free Download!!!

IMG_4015With sick kids, half days and a multitude of other unplanned stuff in our schedule, it’s been taking me longer than I would have liked to get these valentine bookmarks finished and shared for a valentine freebie! But, alas, I finished {sigh}.

I really try to limit the trinket quota in our house, but it always seems to be a loosing battle. However, I trudge on and hope someday my house will be a trinket free zone (wishful thinking, right?). That said, for valentine’s day, it’s a mecca of trinkets and so in the past I’ve just done some simple valentine cards (see my Etsy Shop) with a lollipop taped to the back. For fear my kids will get bored with my noncreative valentine efforts (however, I thought their cards were pretty cute, but kids could care less about the design…it was for me 🙂 ), I decided to create some valentine bookmarks. Not as exciting as candy, but my mom conscience feels much better about it! So here you have it…they are a free download for the next week and then they will be available on my Etsy Shop for purchase after that.  Just print (on card stock), trim and write on the back and you are finished! Enjoy 🙂

Pajama and Pancake Birthday Party

IMG_3979It’s been a few weeks since my daughter had her birthday, but shortly after we dashed off to Hawaii (can’t complain!!!) and now we are back to the daily grind of life. I’ve been anxious to post about Vivienne’s birthday party. I thought it turned out so cute, but I must apologize for some of my pictures. I am by no means a professional photographer nor do we feel it necessary to hire one for a kids party. Every thing we do, we do it ourselves…except for the cake. I’ve learned my DIY limits and cake decorating is not my thing 😉

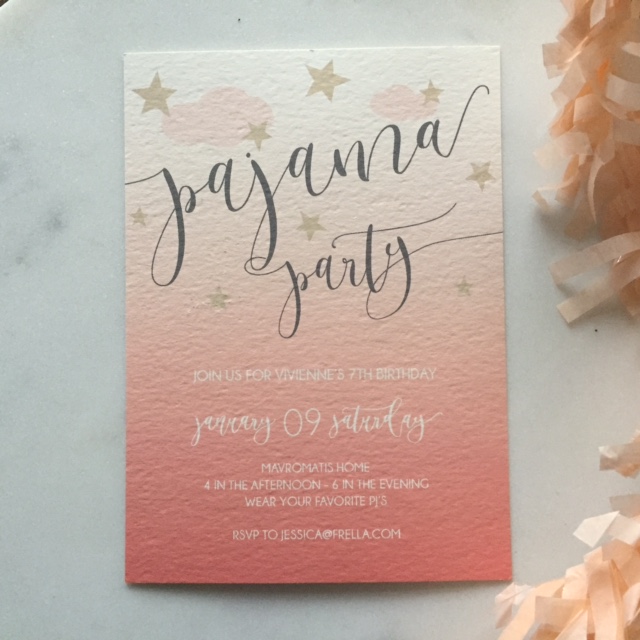
After a year long conversation of Viv telling me she wanted a pirate party, a few weeks before I needed to send out the invites, she threw me a curve ball and said she wanted a slumber party? “A wha, wha?!!” I said. Me not being ready to host a sleep over with a bunch of six and seven year olds, seeing disaster in the making, years off my life and no sleep, I gently suggested a pajama party instead with breakfast for dinner (who doesn’t love that?!). She was sold! Amen to that! So I had a few weeks to rethink party ideas and come up with a game plan and here you will see the results with corals, peaches and golds as the main theme.

IMG_3817

IMG_3810
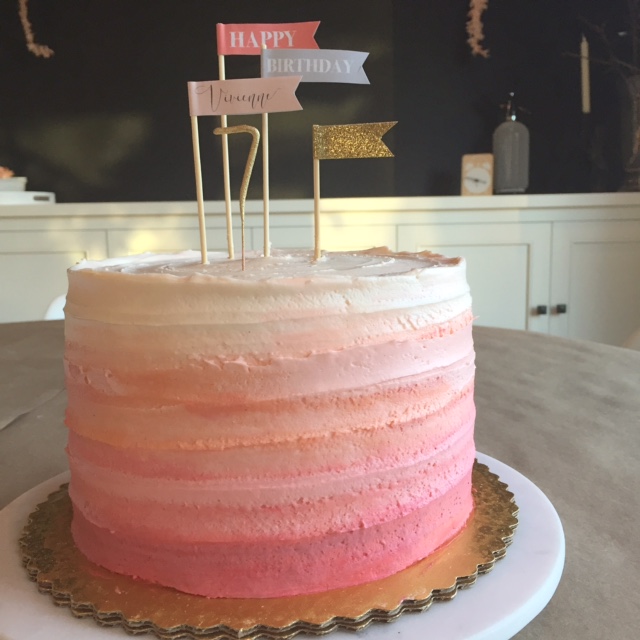
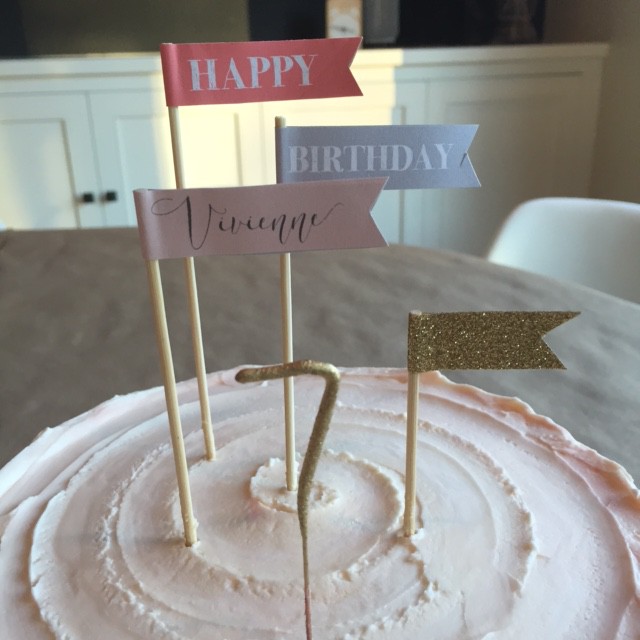
To keep with the ombre theme of the invitation, I had our local store do an ombre cake which I thought they did a fantastic job and much better than I could have ever attempted. Then I topped it with some sticker flags and gold washi tape I whipped up along with a #7 sparkler candle.

IMG_3848

IMG_3781

IMG_3777
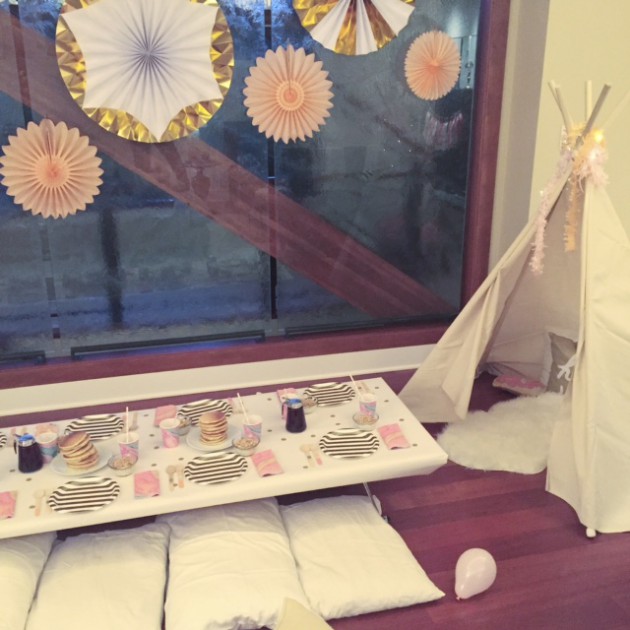
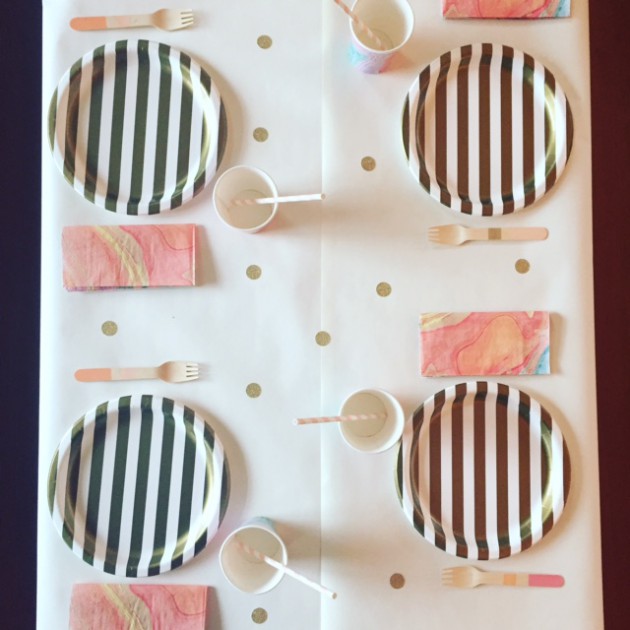
To set the scene and create an intimate, cozy atmosphere, I used a low table covered with white kraft paper and gold sparkle stickers. The kids sat on pillows and ate pancakes, fruit and yogurt parfaits…talk about sugar overload!! On either sides of the table, I had a teepee with faux sheep skin (#ikea) rugs and pillows inside. I already had one teepee I had made years ago, but I wanted one more without the effort of cutting and sewing. So with a little Google help, I saw some no-sew ideas and came up with my own take. Talk about easy!! Just using some 6′ wood dowels, a painters drop cloth and a few pushpins and you are good to go!! I also topped the teepees with some tissue garland and what I call “fairy lights” I had picked up a while ago from the #target dollar bin. That place can be a gold mine if you check regularly. Finally, we have a glass panel wall that I used to hang some gold and peach pin wheels as a back drop. Super cute!! 
IMG_3819
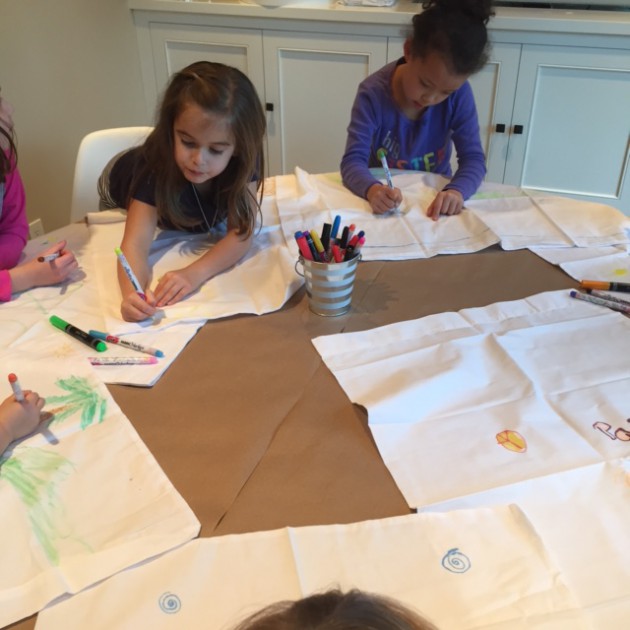
For activities we had a donut from a string eating contest (that was a big hit!!) and then the kiddos decorated their own pillow cases with fabric markers. It kept them busy for quite a while and it was fun to see what they came up with.

IMG_3784

IMG_3783

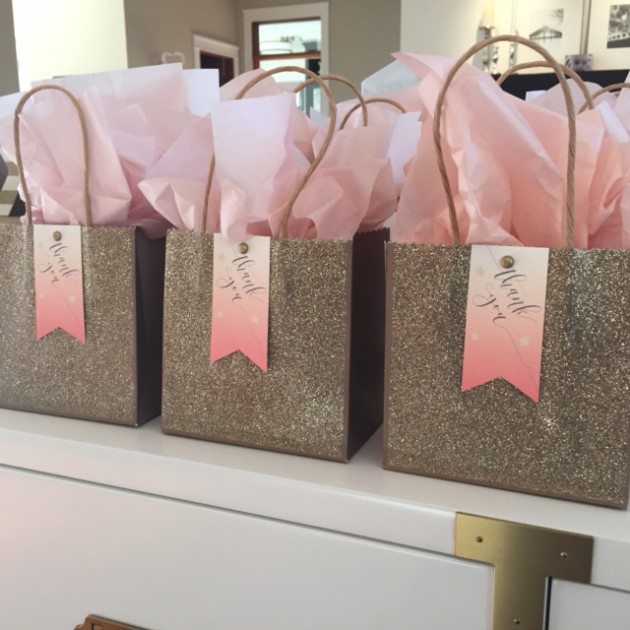
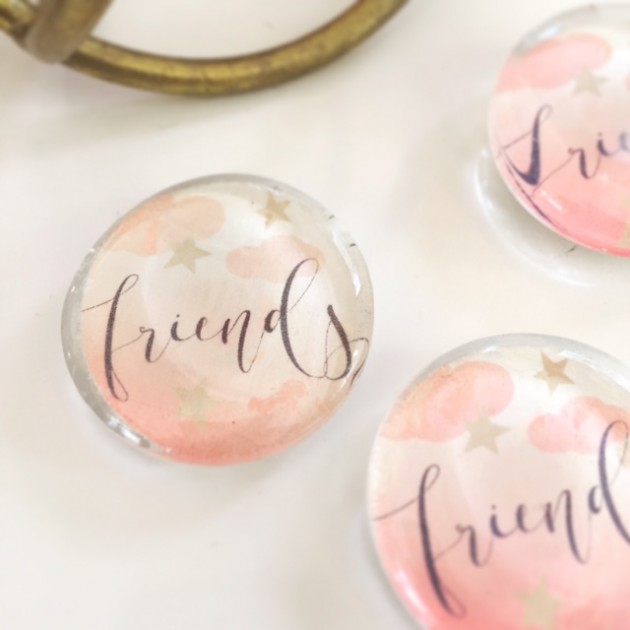
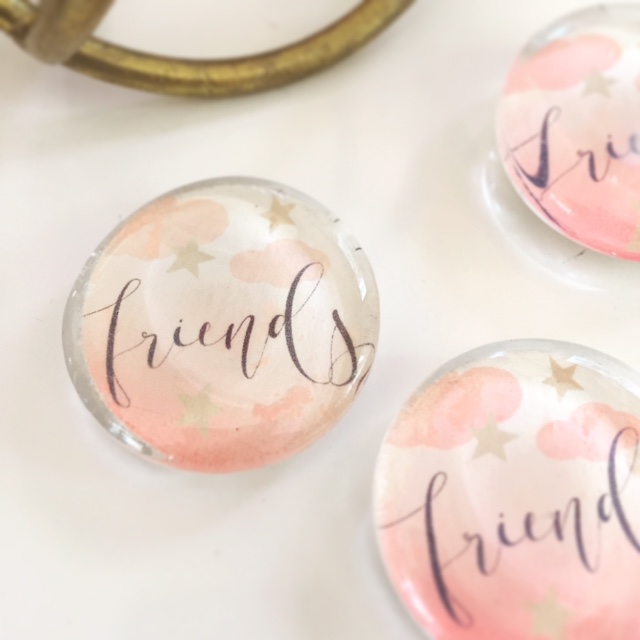
Finally, for the favors, I found these sparkly gold bags from (again) the Target dollar bin that I dolled up with some Thank You tags and filled them each with a peach colored bracelet, some donut shaped soap from Etsy, and these glass magnets I made that coordinated with the invitation. Over all I think all the kiddos had fun and who doesn’t like hanging out in your jammies?! To take one for the team, I even wore mine and I have to say, it’s the most comfortable I’ve ever been at a party 😉

*Most of the party supplies were from Shop Sweet Lulu and Target

**If you have any questions about how I created or styled some of the party items, I am happy to answer!